Giving a headphone mix for recording is easy enough right? just take a splitter and give the same mix to the artist as the one you’re listening to… right? Well, It’s that easy unless the drummer can’t hear the click at a comfortable level and you have to send the click at a deafening level, or the Guitar needs himself louder than everything in the Mix. Not That Easy now, is it? unless you can tolerate the same level in your headphones/control room. There’s gotta be a better way, right? Yup, there is
In this article, we’ll discuss how to give a Headphone Mix (a.k.a Cue Mix) to an Artist/Musicians for recording.
So there’s something you’ll need to keep in mind, you’ll need an audio interface with more than 1 Pair of Outputs i.e Your interface needs to have an “Output 3–4”, in addition to your Primary outputs.

Don’t Have an interface with More than 1 pair of outputs?
Don’t worry, People working on macOS need not have this as there’s another way to do this which I’ll talk about at the end of this article. Sorry Windows users.
Got It? So, Lets Begin
I’ll be demonstrating this using Pro Tools and the Solid State Logic SSL 2+ Interface which has 2 headphone outs, This can be translated to any other DAWs and systems easily. Read This Article if you want to know if you should use Pro Tools or not
1. Prepare Your session for a regular recording session


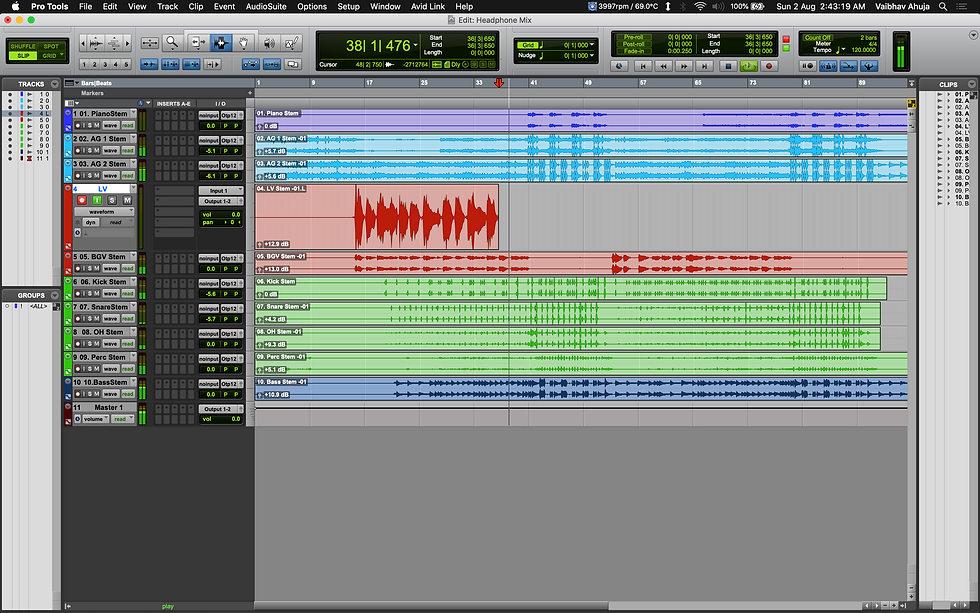
Get your tracks ready, get a rough mix if you have more than 1 track. Could be a Karaoke, or a backing track or anything, get your levels Right for yourself.
2. Headphone Master Track

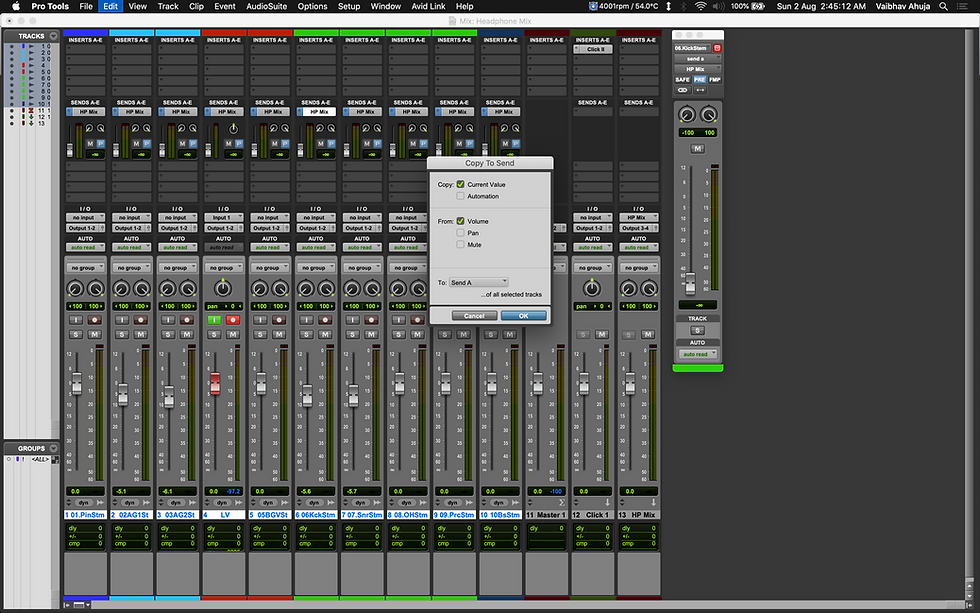
Make an Auxillary track, Name it “HP Mix” or something recognizable. This will be your headphone Master track. Set the output of this track to go to ‘Output 3–4’ and Solo Safe (Solo Lock in some DAWs) the track (Cmd+Click the Solo button) so in case you solo a track, it will not affect what is going to your headphones (may or may not apply to your DAW. If you don’t know what Auxillary tracks are Read this article (Link Not Active yet).
3. Routing Your Tracks

Now for routing your tracks to your headphones, add a Pre-Fader Send on the tracks you want to send to your headphones to go to the HP Mix track. Using the Pre-Fader part is essential, as this will bypass your main track fader (and mute and solo Buttons in some DAWs, not all) and in case you need to change what you’re hearing on your monitoring device (headphones/speakers), this will not affect the mix going to the headphones and will not distract the artist. Pro Tools Tip: Use Cmd+Option+H to use the ‘Copy to Send’ if you want to start with sending your mix to the headphones.

4. Set Your Levels for the Artist

Now you can start sending the levels to the sends. Keep in mind the Send Level is what is going to the artist and is completely independent of what you’re hearing on your Monitors. So If the Artist needs a change in level, Turn up the Send and Not your Track fader!
Voila! You’ve got an independent Headphone Mix.
You can replicate this process as many times you want with as many outputs as you have on your Audio Interface.
Now let’s talk about when you don’t have an interface with more than 1 pair of outputs (like Focusrite Scarlett Solo, 2i2, PreSonus AudioBox USB, Motu M2, Audient iD4, EVO 4, etc.) You can utilize your Mac’s built-in headphone out for the Artist and give him a Mix using that feature called Aggregate Device.
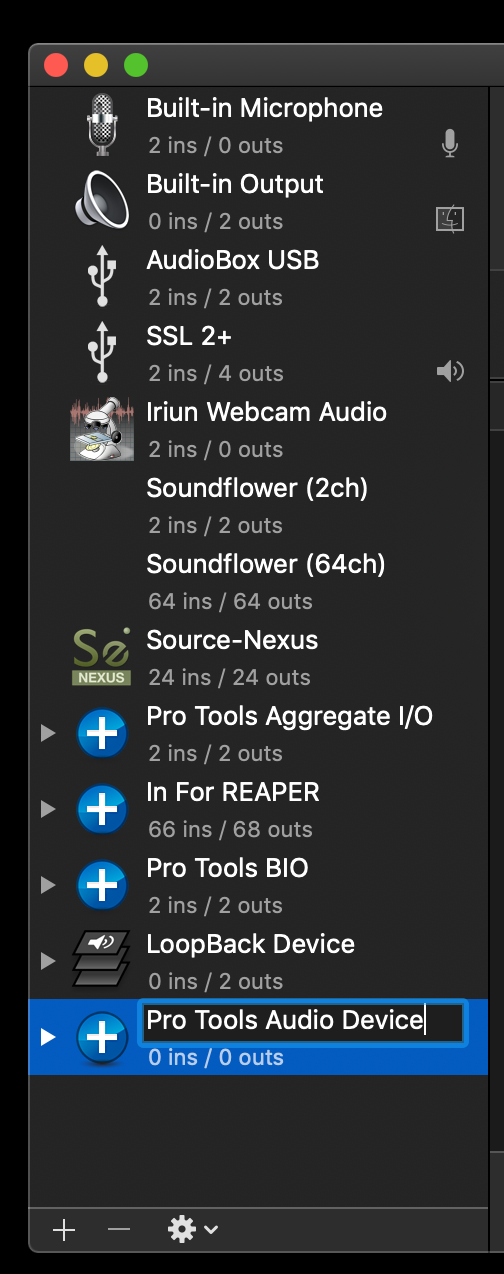
1. Go to your Macs ‘Audio Midi Setup’
2. Go to the “+” (plus) sign on the bottom left on the list
3. Select ‘Create Aggregate Device’ and rename it to something recognizable I Named it “Pro Tools Audio Device”


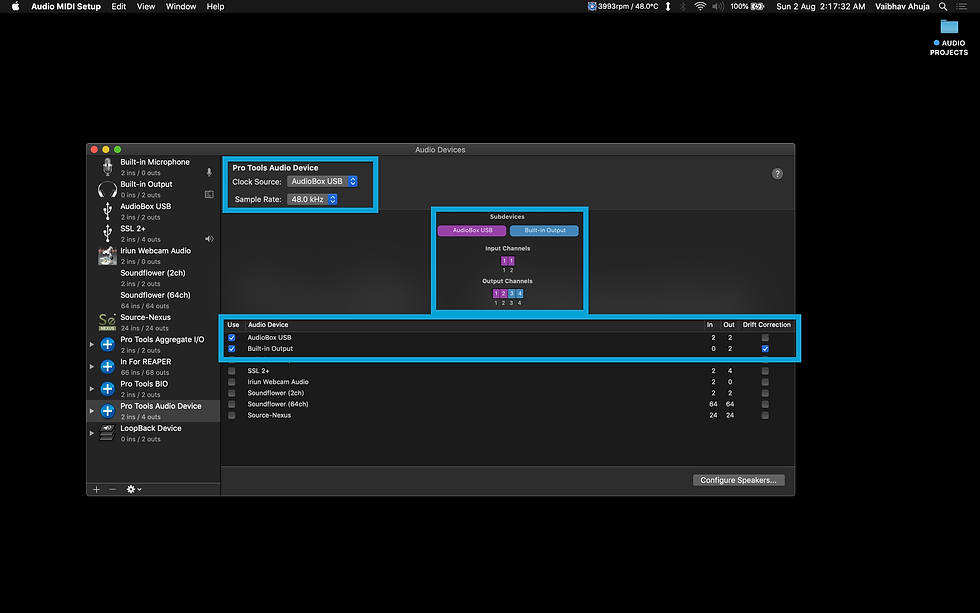
4. Select your primary audio interface FIRST. then select your ‘Built-in Output’ or ‘Headphones’ The order of selection absolutely matters. Make sure the ‘Master Device’ is set to your audio interface and Drift Correction is selected to your Built-in Output. Set your Mac's headphone Volume to full and Control it from your DAW’s Headphone Master.

If you selected it correctly then now your Built-in Output should work as Output 3–4.
Select the Aggregate Device or whatever you named it on your DAW as Playback Engine or Audio Device. Important — Pro Tools Users make sure to update your I/O Setup to Accommodate the New Output Devices.
Now you can follow the same procedure mentioned above to get your headphone Mix.

Comments